Authentication
The Sentinel Hub API uses OAuth2 Authentication and requires that you have an access token. In essence, this is a piece of information you add to your requests so the server knows it's you. These tokens do not last forever for a multitude of reasons, but you can get new ones and when they expire from the Sentinel-Hub OAuth2 server at the token endpoint listed below. But first, if you do not have one already, you need to register an OAuth Client in your account settings. This is so the server can expect you to make such token requests.
How to use tokens
Once you have a token, do use it for authenticating all your requests within its validity period. While tokens do not last forever, they do last a reasonable amount of time, and sufficiently long that they can be reused. The information of how long each token lasts is embedded in the token itself in the exp claim, and can be read from there.
Do not fetch a new token for each API request you make. Token requests are rate limited, so if you are getting an HTTP 429 error, that means you are requesting too many tokens.
Tokens are JSON Web Tokens (JWT), more information about them here or here.
Registering OAuth client
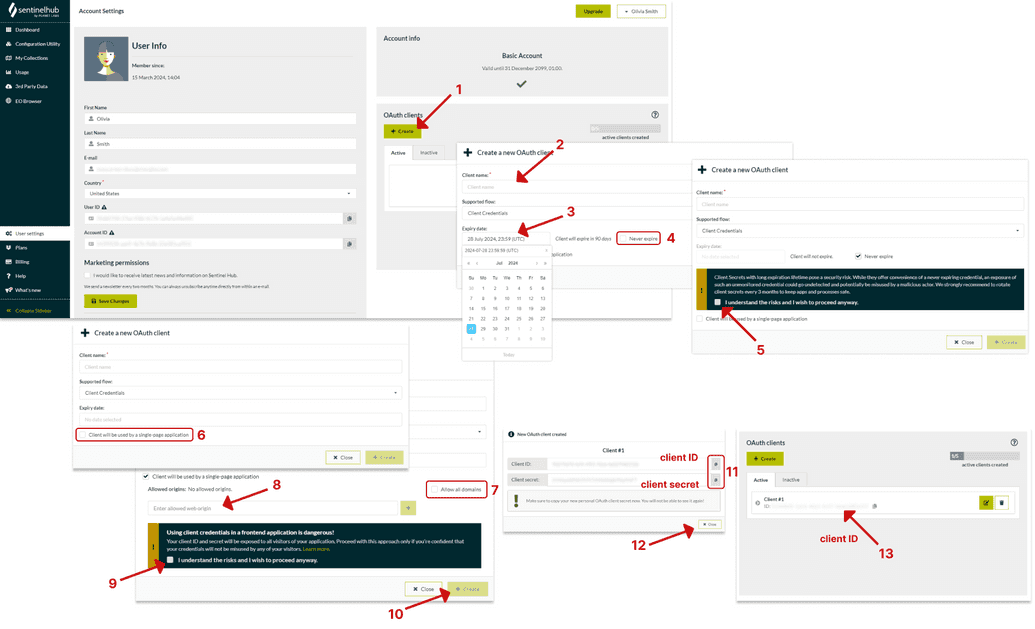
To register an OAuth client, open the “User Settings” tab in the Dashboard app and locate the “OAuth clients” section. Click on the Create button (1). Provide a name for your OAuth client (2). You can select the Expiry date for your client (3) or select “Never expire” if you want your OAuth client to be indefinite (4). For OAuth clients without expiration you will need to confirm your understanding of risks (5). If your OAuth client will be used by a single-page application (SPA), select the corresponding option (6). If the SPA option is selected, you'll be prompted to choose between "Allow all domains" (7) or specify the web origins (8) from which the OAuth Client will be used. Confirmation is required if you selected to use the OAuth client in a frontend application, acknowledging the risks of exposure (9).
Once all mandatory fields are filled, proceed by clicking the Create button (10).
Your client ID and client secret will be displayed. You may now copy both client ID and the client secret (11). Ensure to copy the secret value and paste it securely as it won’t be retrievable once the pop-up closes! After copying, click Close(12). With the client ID and client secret in hand, you are now prepared to request tokens.
Upon completion, you’ll find your newly created OAuth client with its corresponding ID and name (13) listed under the “OAuth clients” section.
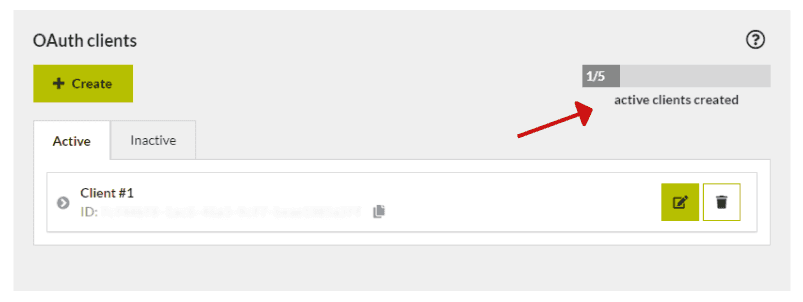
The number of OAuth clients is limited to the plan you are using. In User settings tab within the “OAuth client” section you will be able to view how many OAuth clients you have left.
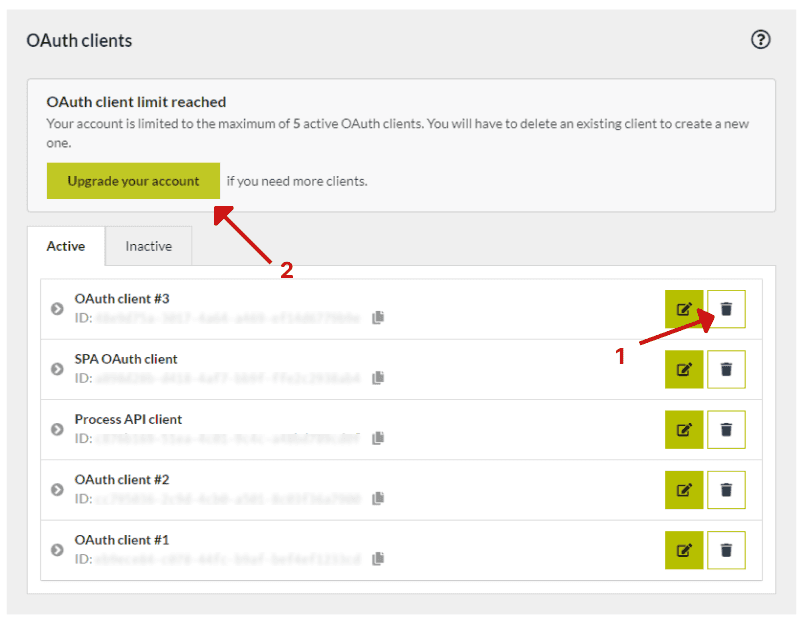
In case you reached your limit, a notification will be shown in the “OAuth clients” section that you have reached your limit. Now, you have two options: 1) you can delete an existing OAuth client to create a new one or 2) you can upgrade your account by clicking on the Upgrade your account to view your options.
Inactive clients
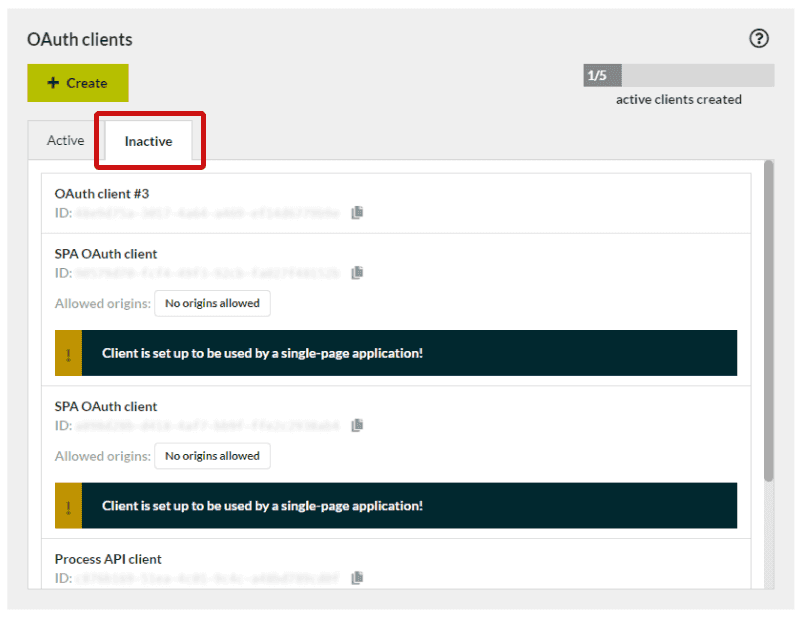
Once an OAuth client has expired, it is moved to a list of inactive clients. Similarly, deleted clients will also appear in this list as inactive clients.
OAuth2 Endpoints
Token Endpoint - for requesting tokens
https://services.sentinel-hub.com/auth/realms/main/protocol/openid-connect/token
Token Request Examples
cURL
The following cURL request will return an access token, just make sure to replace <your client id> with your client ID and <your client secret> with your client secret:
curl --request POST --url https://services.sentinel-hub.com/auth/realms/main/protocol/openid-connect/token --header 'content-type: application/x-www-form-urlencoded' --data 'grant_type=client_credentials&client_id=<your client id>' --data-urlencode 'client_secret=<your client secret>'
Postman
In the Postman request Authorization tab set the Type to OAuth 2.0 and Add auth data to to Request Headers. Set the Grant Type to Client Credentials, the access token URL to the token endpoint, then set the Client ID and Client Secret to the values of your OAuth Client. Scope can be blank. Set Client Authentication to Send client credentials in body. Click Get New Access Token button. You should get a new one immediately. To use this token to authorize your request, click Use Token. For more information see the Postman authorization documentation
Python
In python the requests-oauthlib library can handle the retrieval of access tokens using your OAuth Client configuration.
from oauthlib.oauth2 import BackendApplicationClientfrom requests_oauthlib import OAuth2Session# Your client credentialsclient_id = '<client_id>'client_secret = '<secret>'# Create a sessionclient = BackendApplicationClient(client_id=client_id)oauth = OAuth2Session(client=client)# Get token for the sessiontoken = oauth.fetch_token(token_url='https://services.sentinel-hub.com/auth/realms/main/protocol/openid-connect/token',client_secret=client_secret, include_client_id=True)# All requests using this session will have an access token automatically addedresp = oauth.get("https://services.sentinel-hub.com/configuration/v1/wms/instances")print(resp.content)
requests-oauthlib doesn't check for status before checking if the response is ok. In case there's a server error, the user can receive an incorrect error, which falsely makes it seem as if the issue is on client side. Library's compliance hooks will prevent the invalid status response from being ignored, returning the correct error. To use them, add the following code:
def sentinelhub_compliance_hook(response):response.raise_for_status()return responseoauth.register_compliance_hook("access_token_response", sentinelhub_compliance_hook)
Javascript
Example using axios.
import axios from "axios"import qs from "qs"const client_id = "<client_id>"const client_secret = "<secret>"const instance = axios.create({baseURL: "https://services.sentinel-hub.com"})const config = {headers: {'Content-Type': 'application/x-www-form-urlencoded;charset=utf-8'}}const body = qs.stringify({client_id,client_secret,grant_type: "client_credentials"})// All requests using this instance will have an access token automatically addedinstance.post("/auth/realms/main/protocol/openid-connect/token", body, config).then(resp => {Object.assign(instance.defaults, {headers: {authorization: `Bearer ${resp.data.access_token}`}})})


